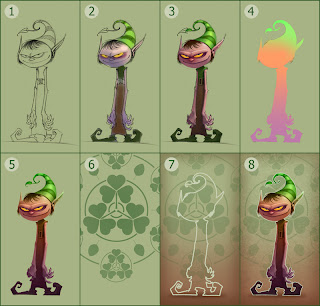
For those that may be interested, I know there's at least one out there, I've provided an insight into how I work to create the images I do, using my recent Elf picture as an example:
1. I start in Photoshop, the background is generally a flat, neutral color. The sketch is on a multiply layer on top of that.
2. I then take the .psd to Painter and do a quick, dirty color/rendering pass with the Digital Airbrush tool on a layer between the background and the drawing. I was at first going for a green/purple color palette though it always changes as I go along.
3. Then, in a new layer on top of the others I do the actual painting usually with the Cover Pencil brush. Here, in addition to rendering the character, I refine the colors and shape.
4. Back in Photoshop I hide the original drawing and, in a new top layer, block out the shape of the character in flat color. I then modify a copy of that shape to display these color gradients.
5. Next, I make the layer I created in step 4 a color layer at about 50% opacity. This gives the colors more depth and variety. I like the effect of one color fading into another that this provides as well.
6. I like wallpaper designs for backgrounds because...well, because. I just make these in Photoshop using the selection tools, Fill command, and Rotate/Translate commands.
7. I pull the opacity of the wallpaper design way down and add gradients and new colors to the background. I then use the Magic Wand tool to select the edges of the character by using the flat color shape I created in part 4. Then using the Edit/Stroke tool I get an outline around the subject.
8. Bringing back the character and adding a little texture to the background gives me the final image.
wow love this character design!
ReplyDeleteAlso, great little tutorial, thanks for sharing your process. I like the idea of doing a colour gradient, I think Im gonna give that a go!!!
Cheers
Ken :D
fun stufff....
ReplyDelete... its nice to see the process of your work, i would have never guesed. I like how it turned out!!
Thanks for sharing Kevin! This guy is great! He likes the missing Christmas counterpart to the Gorillaz.
ReplyDeleteHa Ha now I can rule the world! (OK maybe not.) I still can't produce art as fantastic as yours. I really do like what you did in step 4. Very cool stuff!
ReplyDeleteGorgeous work sir! i love your blog, it's one of my daily stops for inspiration. keep up the great work!
ReplyDeletevery cool. I love the process all spelled out.
ReplyDeletelove the elf and enjoy looking at your process. Great one as usual.
ReplyDeleteFinally I know how your secret is done. Thanks bro.
ReplyDeleteI also finally have an avatar to go with my comments.
I'm glad I finally found your stuff again. Love what you did and thanks for taking the time to post your tutorial. I'll be stopping in more often to see more of what you create.
ReplyDeleteKevin, this is awesome! I'm geeking out over step 4. Can't wait to try it!
ReplyDeleteVery cool! Thanks for sharing the method to your madness.
ReplyDeleteI just found your blog and I'm making my way back through the entries... really impressive work. Thanks for the tutorials too!
ReplyDeletewhat fun!!
ReplyDelete