Friday, December 28, 2007
Thursday, December 13, 2007
Christmas Card
Thursday, December 06, 2007
Woodsy Elf, the Making of...

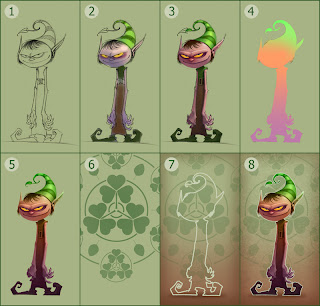
For those that may be interested, I know there's at least one out there, I've provided an insight into how I work to create the images I do, using my recent Elf picture as an example:
1. I start in Photoshop, the background is generally a flat, neutral color. The sketch is on a multiply layer on top of that.
2. I then take the .psd to Painter and do a quick, dirty color/rendering pass with the Digital Airbrush tool on a layer between the background and the drawing. I was at first going for a green/purple color palette though it always changes as I go along.
3. Then, in a new layer on top of the others I do the actual painting usually with the Cover Pencil brush. Here, in addition to rendering the character, I refine the colors and shape.
4. Back in Photoshop I hide the original drawing and, in a new top layer, block out the shape of the character in flat color. I then modify a copy of that shape to display these color gradients.
5. Next, I make the layer I created in step 4 a color layer at about 50% opacity. This gives the colors more depth and variety. I like the effect of one color fading into another that this provides as well.
6. I like wallpaper designs for backgrounds because...well, because. I just make these in Photoshop using the selection tools, Fill command, and Rotate/Translate commands.
7. I pull the opacity of the wallpaper design way down and add gradients and new colors to the background. I then use the Magic Wand tool to select the edges of the character by using the flat color shape I created in part 4. Then using the Edit/Stroke tool I get an outline around the subject.
8. Bringing back the character and adding a little texture to the background gives me the final image.
Wednesday, December 05, 2007
Subscribe to:
Posts (Atom)

